Track Sales Orders Using the "Ship By" Date
When you enter a sales order in the Sales Orders window, you can enter a Ship By date that will help you track the order as well as manage the inventory needed to fill it. Once you enter the Ship By date and save the sales order, Sage 50 lets you create a Sales Orders to Ship event that will show up on the Events tab of the Action Items window. In turn, this event then shows up in the Customer Event Log for the customer who placed the order.
Sage 50 also helps you track your orders by including the Ship By date in the following sales order reports: Picklist report, Sales Backorder report, Sales Order Register, and Sales Order report. While reviewing your reports, you'll see at a glance when the order needs to go out the door.
Creating an event for the sales order to ship
When a sales order has a Ship By date entered for it, you can create a "Sales Order to Ship" event that will show up in Action Item Events.
- From the Tasks menu, select Action Items.
- Select the Options toolbar button.
- In the Action Items and Event Log Options window, select the Transactions tab.
- Locate the "Sales Orders to Ship" event type, and then select the Create Event and Display in Action Items check boxes.
- In the # of Days column, select the number of days before or after the event date you want the event to show up in Action Items.
- In the last column, select whether you want the event to appear before or after the event date.
- Select OK.
Now, to verify that the event is appearing in Action Items, select the Events tab, and look for the Sales Orders to Ship event. The Notes column for this event shows the sales order number, date, and dollar amount.
When you have shipped all items appearing on the sales order, Sage 50 automatically checks the check box in the first column of the event line to indicate that the event has been completed.

Verifying the event in the Customer Event Log and Create Event windows
Once you have created the "Sales Order to Ship" event, Sage 50 automatically creates a Customer Event Log entry for the event. To verify this, do the following:
- From the Sage 50 Maintain menu, select Customers/Prospects.
- In the Maintain Customers/Prospects window, select the appropriate customer or prospect, and then select the Log toolbar button.
- The Customer Event Log window appears. Note that one of the listed events is "Sales Order to Ship."
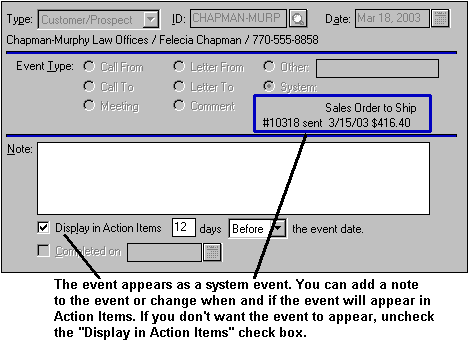
- The Create Event window appears with the sales order to ship noted as a system event.
- If you want to change any of these settings, including removing the event altogether from Action Items, you can do so. To remove the event, uncheck the Display in Action Items check box.
To review the event, highlight the Sales Order to Ship line, and either double-click it or select the Event toolbar button.

Since it is system generated, you won't be able to edit the event, although you can add a note in the Note text box. If you have chosen to display the event in Action Items, at the bottom of the window the Display in Action Items check box will be selected, and Sage 50 will display your choice of when the event will appear in Action Items.